Student's Guide to Using iNaturalist
The information below is also available in PDF form at the bottom of the page. The PDF has more images to accompany the instructions.
I. Set up a personal account and join the class project.
- Go to iNaturalist and click on “Sign Up” in the upper righthand corner of the home page. Fill out the required information.
- Once you have an account and are logged in, hover over your username in the upper righthand corner of the home page and click on "Profile." This will bring you to your user profile, where you can access information about observations and species observed for yourself, people you follow, and projects you are a part of. Click on “Edit account settings & profile,” underneath your avatar/icon image.
- Add a photo of yourself or something to represent yourself by selecting “Change Icon."
- You may also add a brief bio, change your email notification settings, link your iNaturalist account to external photo hosting services, modify the licensing on any photos you upload, etc. When you are finished editing, click “Save” to return to your profile home page.
- Now it’s time to join the class project. On the top navigation bar, hover over “Projects,” and in the search bar on the drop-down menu that appears, type in “Connecting Students to Citizen Science and Curated Collections.” This will bring up the project for this assignment.
- Go to the project page, click on “Join this Project” in the top righthand corner, and follow the steps as prompted. Once you have joined the project, it will show up under “Projects” on the top navigation bar whenever you are logged in.
II. Make an observation.
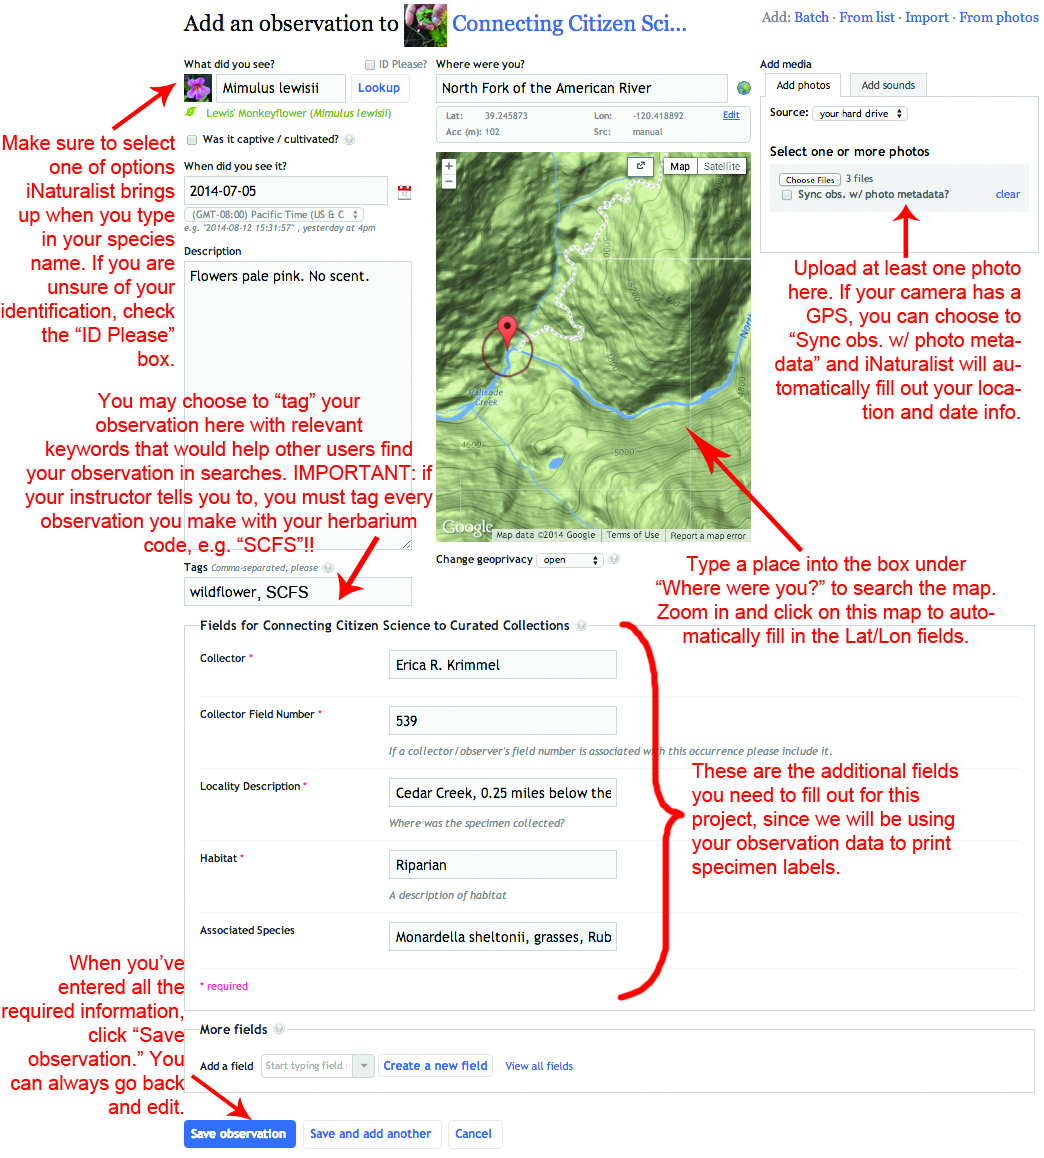
Every time you collect a specimen you will also photograph the living plant and make an observation on iNaturalist. In addition to photographs, you will need to record the following important information on your iNaturalist observation. You will use this data to print labels for your herbarium specimens.
As you fill out your observation information on iNaturalist, the following fields will automatically populate for you:
Country, State, County
Lat/Lon Coordinates
Common Name
Taxonomic authority (your instructor will add the authority to your specimen identifications prior to printing herbarium labels)
You must make sure to enter information for:
Species-level Identification [NOTE: Do not enter the authority name in iNaturalist or else it will not recognize your species! As you begin typing the plant’s name, iNaturalist will offer suggestions–make sure you select the correct species from one of the options it brings up. If iNaturalist does not bring up the species you are trying to identify the observation as, check with your instructor because every so often iNaturalist uses different taxonomy than is found in the source your course uses, although this should be a rare occurrence.]
Collection Date
Description (note qualities of the plant that will not be preserved in the specimen, e.g. colors)
Tags [NOTE: you must “tag” all of your observations with your institution’s herbarium code (e.g. “SCFS”) so that your instructor can easily sort observations for your class. Ask your instructor what herbarium code to use.]
Municipality (e.g. town or region, iNaturalist will help you fill this in when you search for location)
Collector Name (First name, Middle initial, Last name)
Associated Collectors (if present)
Collector Number (no Roman numerals)
Locality Description (driving directions)
Habitat
Associated Species (optional)
Here’s how to make a new observation on iNaturalist:
All observations for this course must be connected to the “Connecting Students to Citizen Science and Curated Collections” project. The easiest way to do this is to go to the project page and click on the orange “Add Observations” button. Note: If you forget to upload this way, you can add previously uploaded observations to a project via the “Add to Project” button on each observation record page.
Selecting “Add Observation” will bring up the screen illustrated below. Fill in the information as shown in the image at the bottom of this page.
Please do not upload in batches, or from photos, because iNaturalist will not bring up the additional required fields for this project. You can, however, make observations using the iNaturalist mobile app.
- Making observations on the iNaturalist mobile app can be convenient if you own a smartphone or tablet and would like to take photos and record your data while in the field. The app can be used offline, and synced once you get back into internet range or cellular reception. Download the app on your mobile device, sign into your iNaturalist account, and enter the same information as shown in the directions above. Please note you always need to add observations to the “Connecting Students to Citizen Science and Curated Collections” project so that the additional fields required will show up on the data entry screen.
IV. Additional Resources
iNaturalist offers additional support for users on these pages:
http://www.inaturalist.org/pages/getting+started
http://www.inaturalist.org/pages/video+tutorials
http://www.inaturalist.org/pages/help
Visual for Adding an Observation